Install Portworx on Red Hat OpenShift Services on AWS
Prerequisites
- You must have a Red Hat OpenShift Service on AWS (ROSA) cluster with bring-your-own-VPC (BYO-VPC) configuration deployed on infrastructure that meets the minimum requirements for Portworx
- Your cluster must be running OpenShift 4 or higher
- Your instance size must be at least m5.xlarge with 3 compute nodes and have 3 availability zones
- Your cluster must meet AWS prerequisites for ROSA
- Ensure that OCP service is enabled from your AWS console
- AWS CLI installed and configured
- ROSA CLI installed and configured
- Ensure that any underlying nodes used for Portworx in OCP have Secure Boot disabled
Configure your environment
Follow the instructions in this section to setup your environment before deploying Portworx on a Red Hat OpenShift Services on AWS (ROSA) cluster.
Create a Portworx user
Before installing Portworx, you must create an AWS user with the required permissions.
From the IAM page, click Users in the left pane.
On the Users page, click Create user in the upper-right corner of the screen to create a new user.
Specify your user details and click Next.
On the Set permissions window, select Attach policies directly and click Create policy.
Copy and paste the following into the JSON tab of the policy editor and click Next:
{
    "Version": "2012-10-17",
    "Statement": [
      {
        "Sid": "",
        "Effect": "Allow",
        "Action": [
        "ec2:AttachVolume",
        "ec2:ModifyVolume",
        "ec2:DetachVolume",
        "ec2:CreateTags",
        "ec2:CreateVolume",
        "ec2:DeleteTags",
        "ec2:DeleteVolume",
        "ec2:DescribeTags",
        "ec2:DescribeVolumeAttribute",
        "ec2:DescribeVolumesModifications",
        "ec2:DescribeVolumeStatus",
        "ec2:DescribeVolumes",
        "ec2:DescribeInstances",
        "autoscaling:DescribeAutoScalingGroups"
        ],
        "Resource": [
        "*"
        ]
      }
    ]
}
Provide a name for your policy and click Create policy. Once your policy is successfully created and attached to your user account, it will be listed in the Permissions policies section.
Select your policy in the Permissions policies section and click Next.
Review your user details and permissions, and Create user.
Create AWS secure credentials
Once the policy is created in the previous section, you need to create credentials for securely logging into your AWS account.
- From the User window, search for your user account created in the previous section using the search bar.
- Once you click your user account name, you navigate to your account information page. Click the Security credentials tab under the Summary section on the info page.
- Select Create access key from the Access keys section.
- Select the Application running on an AWS compute service option and click Next.
- Provide the description tag value and click Create access key.
- Click Download .csv file to save your credentials for use in the later section.
Open ports for worker nodes
Perform the following to add the inbound rules so that the AWS EC2 instance uses your specified security groups to control the incoming traffic.
From the EC2 page of your AWS console, click Security Groups, under Network & Security, in the left pane.
On the Security Groups page, type your ROSA cluster name in the search bar and press enter. You will see a list of security groups associated with your cluster. Click the link under Security group ID of your cluster's worker security group:
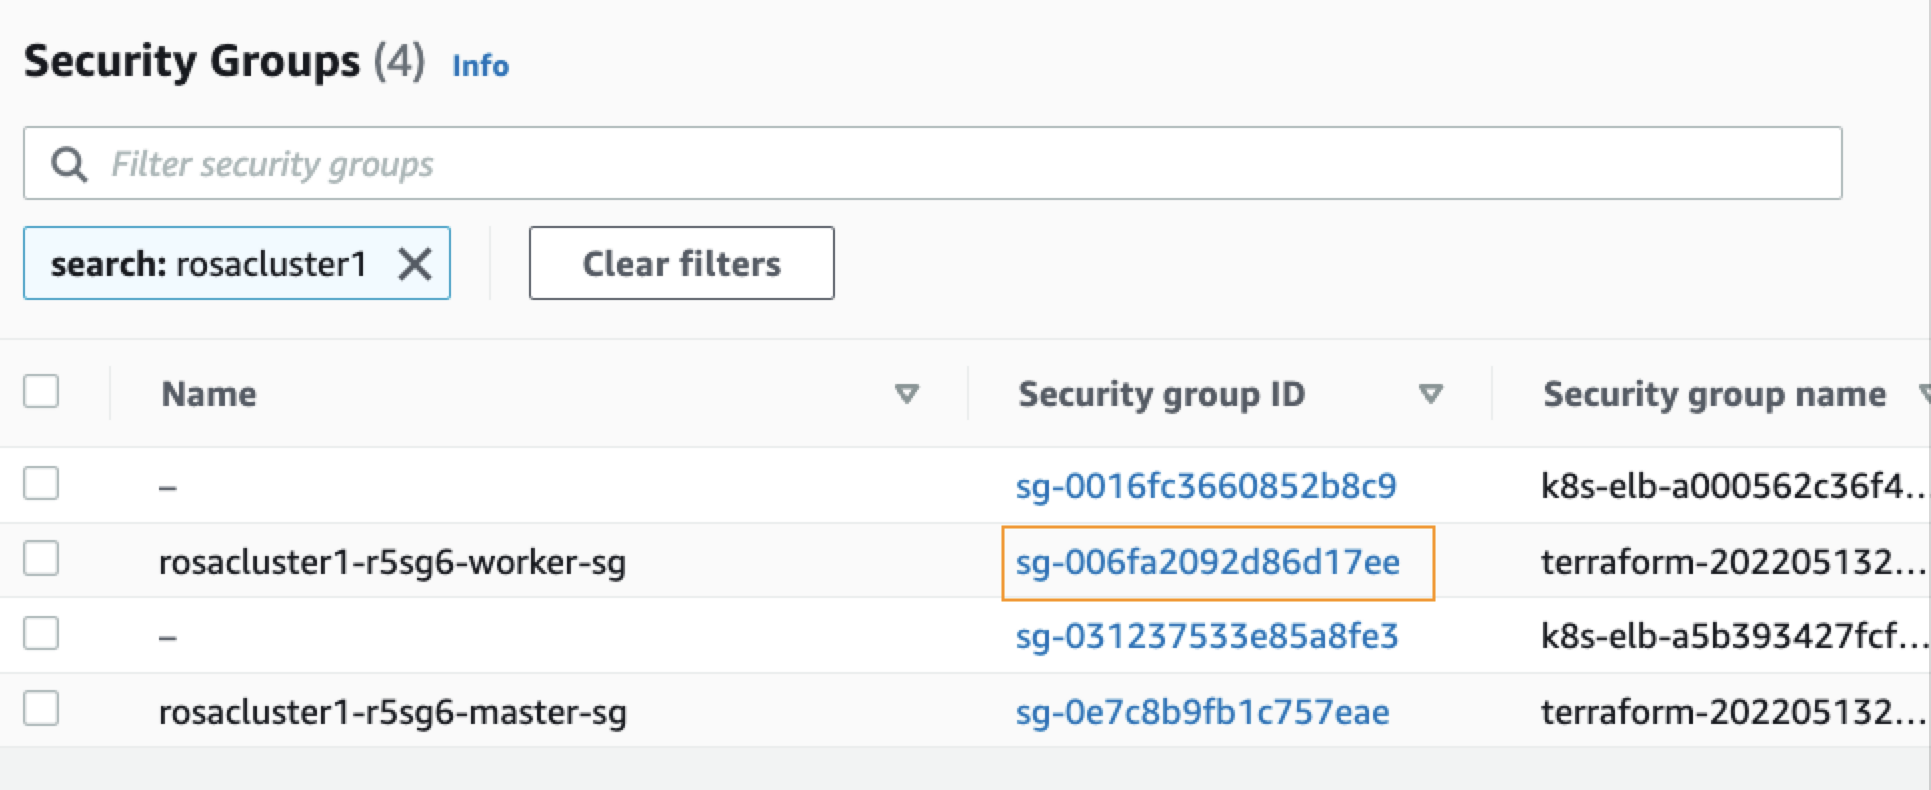
From your security group page, click Actions in the upper-right corner, and choose Edit inbound rules from the dropdown menu.
Click Add Rule at the bottom of the screen to add each of the following rules:
- Allow inbound Custom TCP traffic with Protocol: TCP on ports 17001 - 17022
- Allow inbound Custom TCP traffic with Protocol: TCP on port 20048
- Allow inbound Custom TCP traffic with Protocol: TCP on port 111
- Allow inbound Custom UDP traffic with Protocol: UDP on port 17002
- Allow inbound NFS traffic with Protocol: TCP on port 2049
Make sure to specify the security group ID of the same worker security group that is mentioned in step 2.
Click Save rule.
Create a monitoring ConfigMap
Newer OpenShift versions do not support the Portworx Prometheus deployment. As a result, you must enable monitoring for user-defined projects before installing the Portworx Operator. Use the instructions in this section to configure the OpenShift Prometheus deployment to monitor Portworx metrics.
To integrate OpenShift’s monitoring and alerting system with Portworx, create a cluster-monitoring-config ConfigMap in the openshift-monitoring namespace:
apiVersion: v1
kind: ConfigMap
metadata:
  name: cluster-monitoring-config
  namespace: openshift-monitoring
data:
  config.yaml: |
    enableUserWorkload: true
The enableUserWorkload parameter enables monitoring for user-defined projects in the OpenShift cluster. This creates a prometheus-operated service in the openshift-user-workload-monitoring namespace.
Install Portworx
Follow the instructions in this section to deploy Portworx.
Generate Portworx spec
Navigate to Portworx Central and log in, or create an account.
Select Portworx Enterprise from the Product Catalog page.
On the Product Line page, choose any option depending on which license you intend to use, then click Continue to start the spec generator.
For Platform, choose AWS. Under Distribution Name, select Red Hat OpenShift Service on AWS (ROSA). Enter your cluster's Kubernetes version, then click Customize at the bottom of the window.
Click Next and navigate to the Customize window to specify your previously created AWS security credentials in the Environment Variables section as follows:
- name:
AWS_ACCESS_KEY_ID; value:<your-aws-access-key> - name:
AWS_SECRET_ACCESS_KEY; value:<your-aws-secret-access-key>
Click Finish to generate the specs.
- name:
Log in to OpenShift UI
Log in to the OpenShift console by following the quick access instructions on the Accessing your cluster quickly page in the Red Hat OpenShift Service on AWS documentation.
Install Portworx Operator using the OpenShift UI
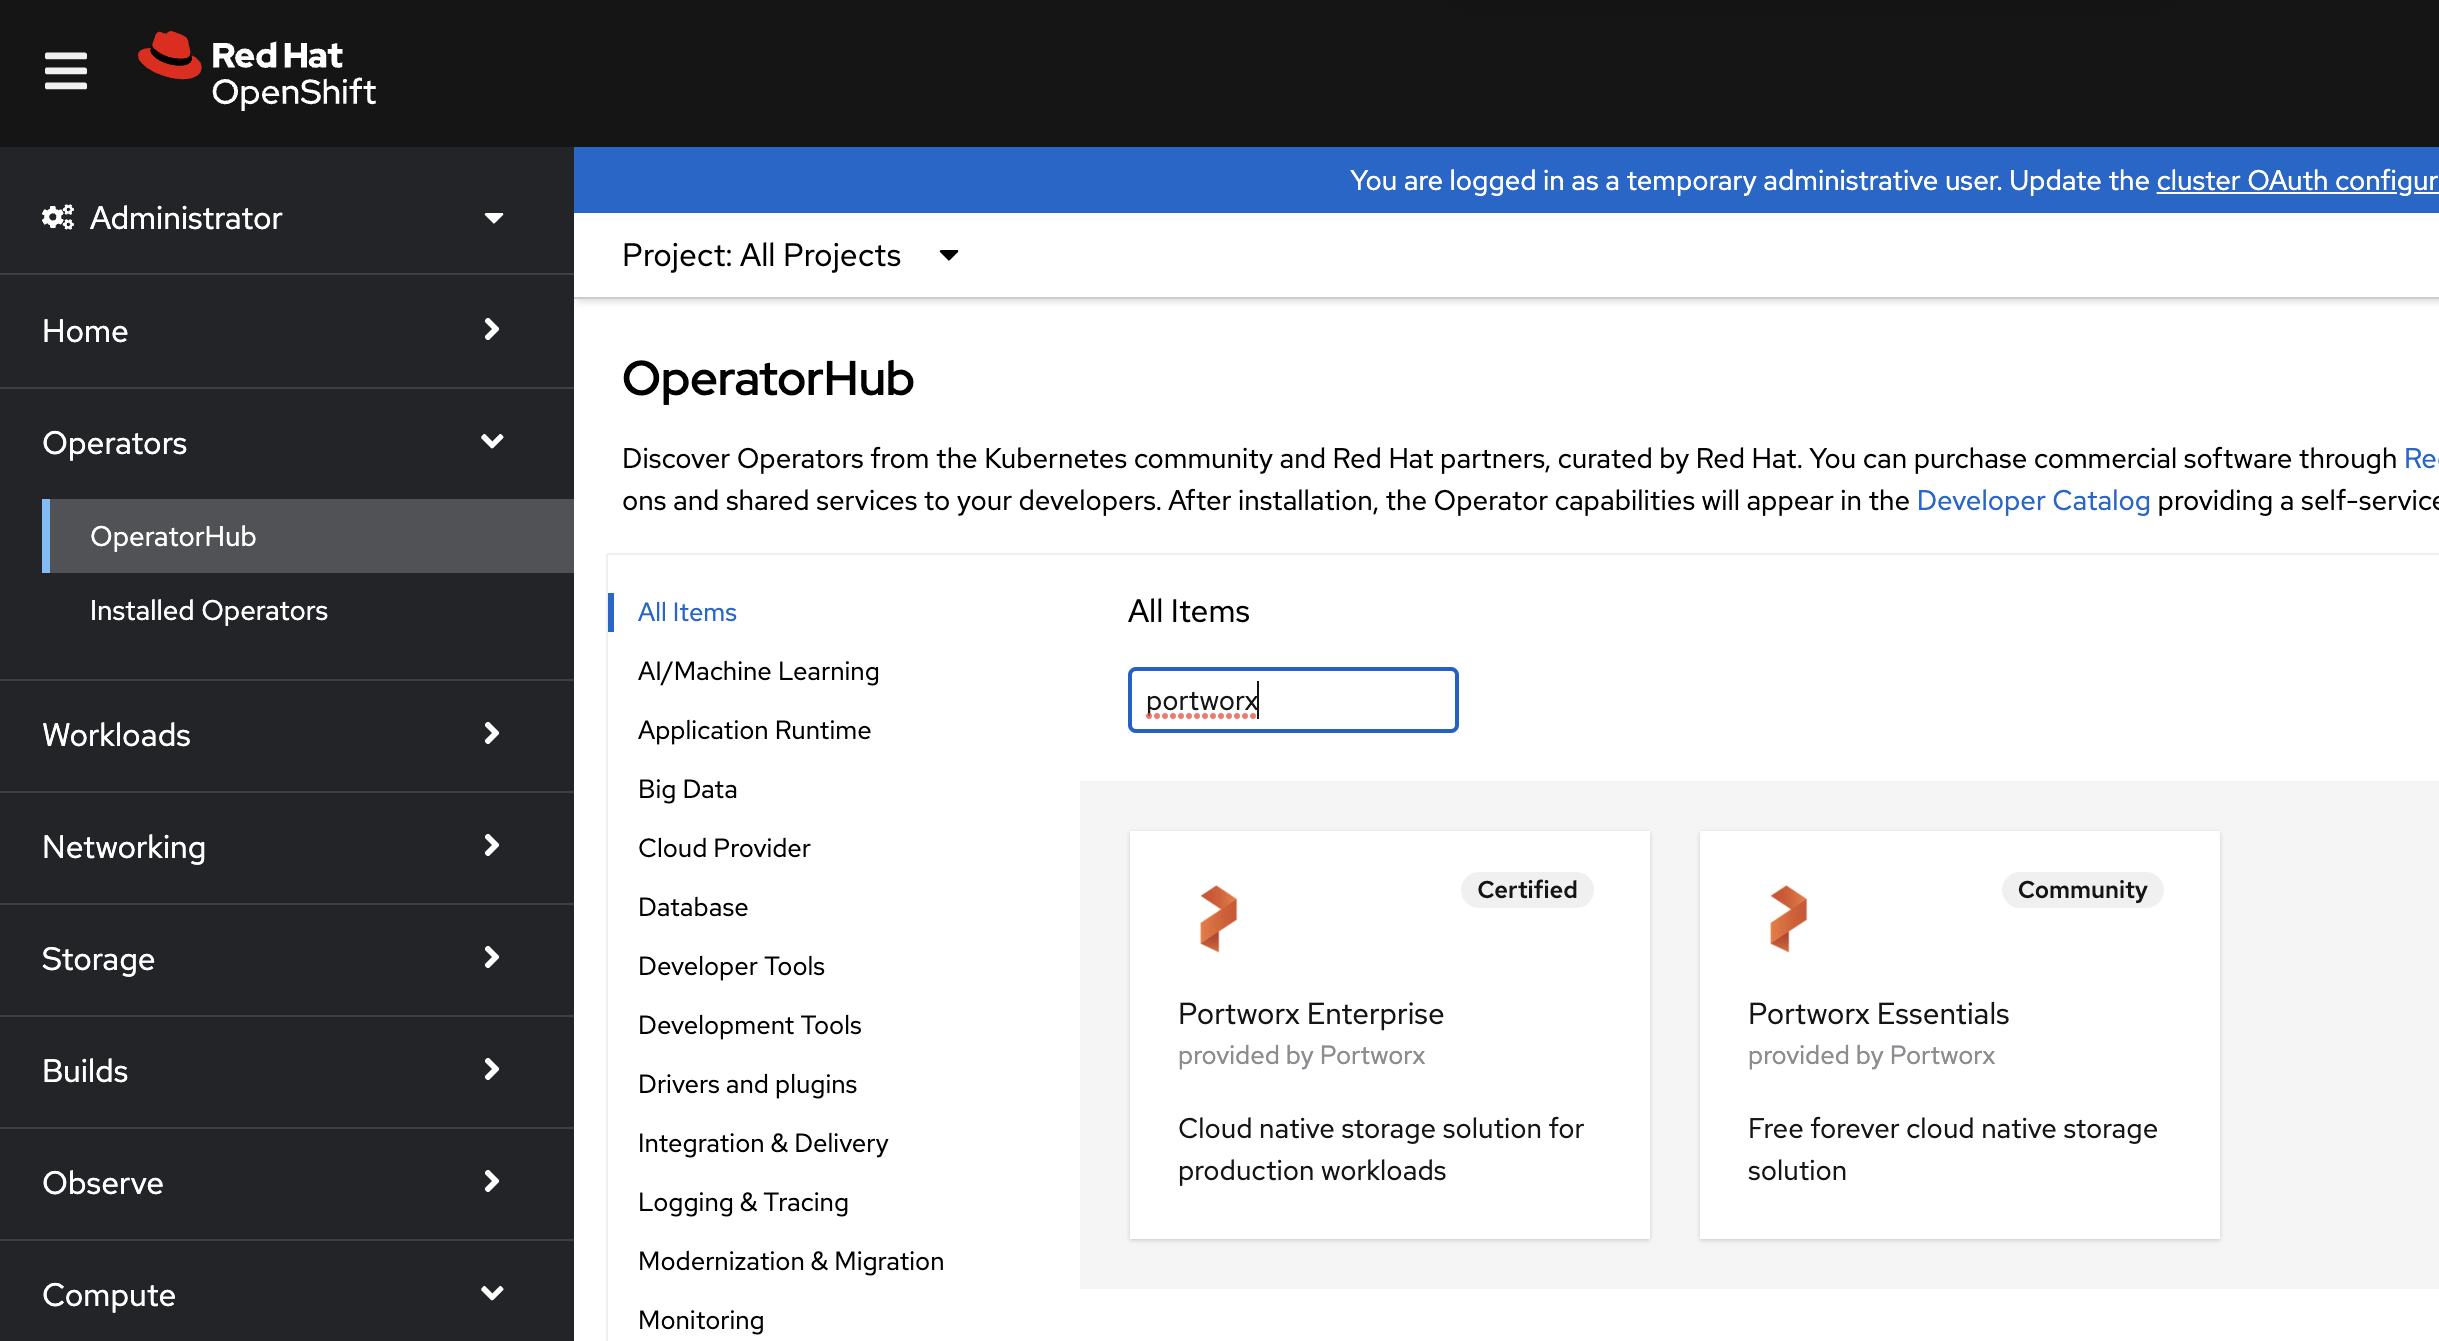
From your OpenShift console, select OperatorHub in the left pane.
On the OperatorHub page, search for Portworx and select the Portworx Enterprise or Portworx Essential card:
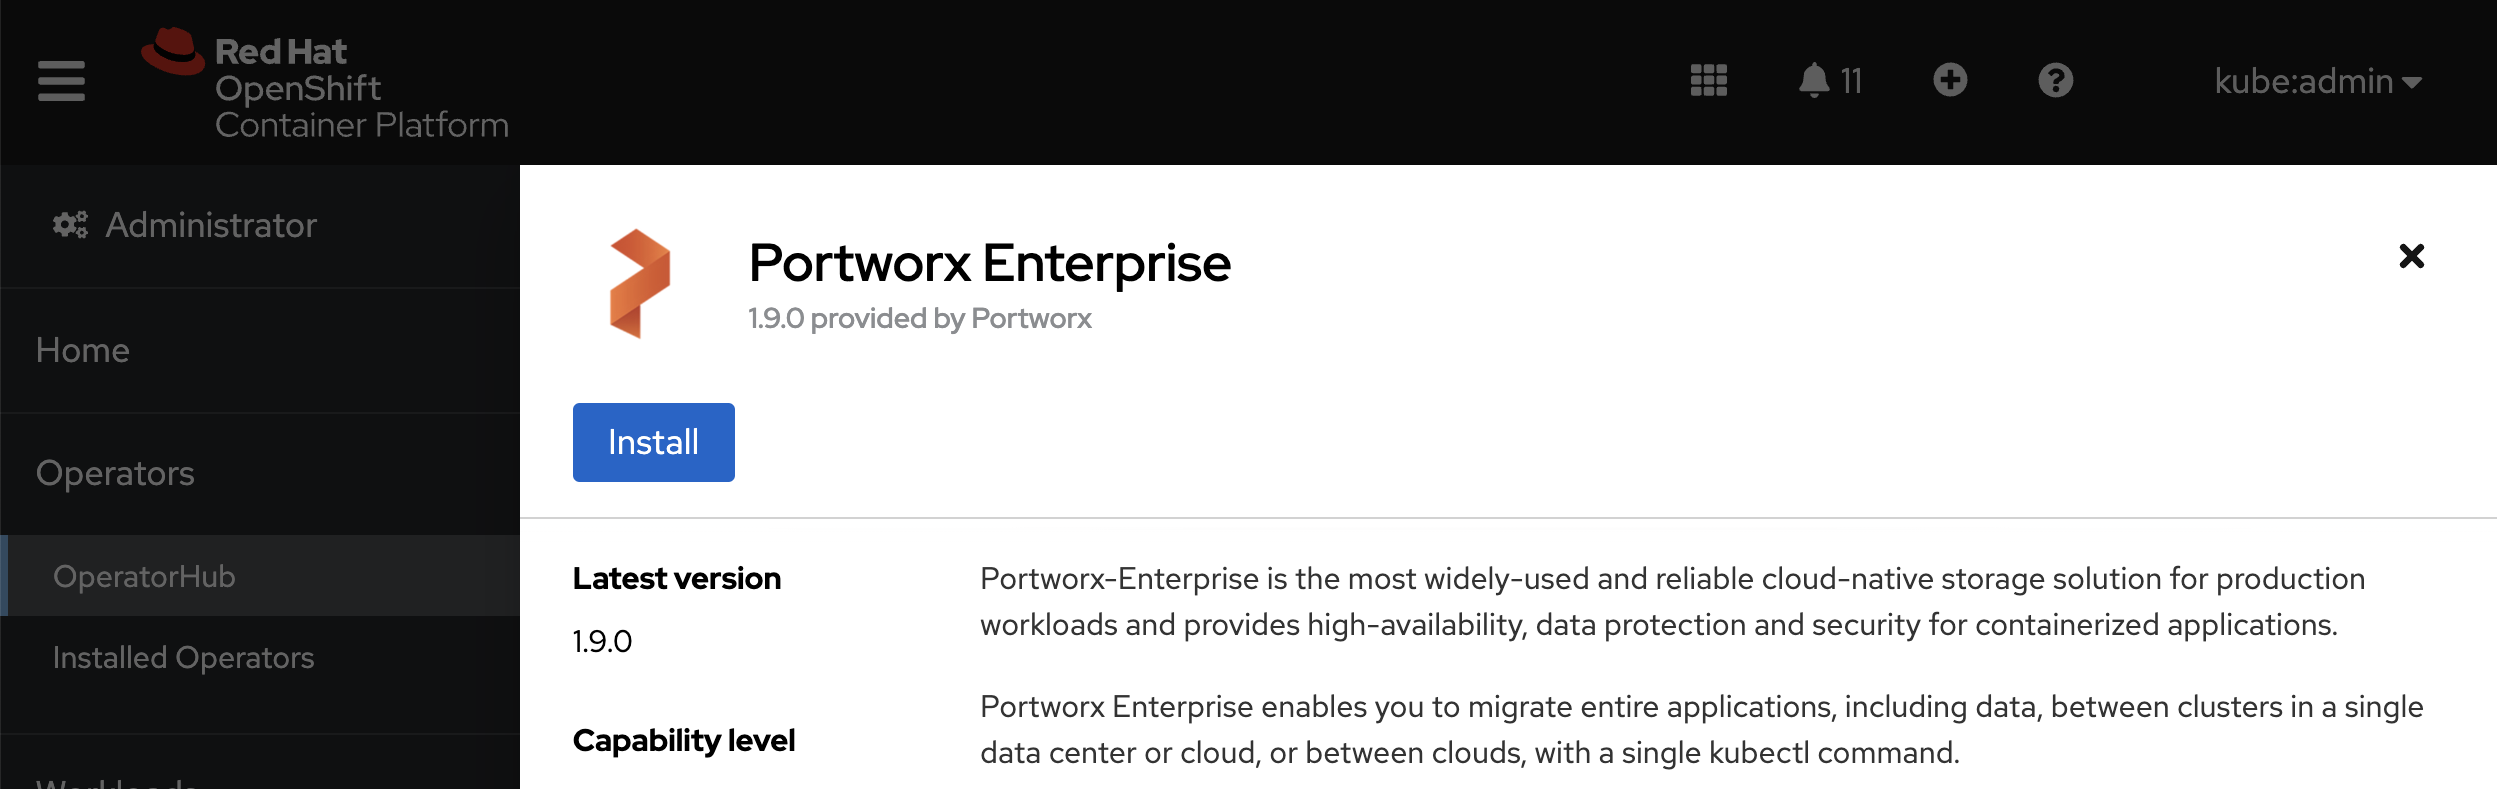
Click Install:
The Portworx Operator begins to install and takes you to the Install Operator page. On this page, select the A specific namespace on the cluster option for Installation mode. Select the Create Project option from the Installed Namespace dropdown:

On the Create Project window, enter the name as
portworxand click Create to create a namespace called portworx.Click Install to install Portworx Operator in the
portworxnamespace.
Apply Portworx spec using OpenShift UI
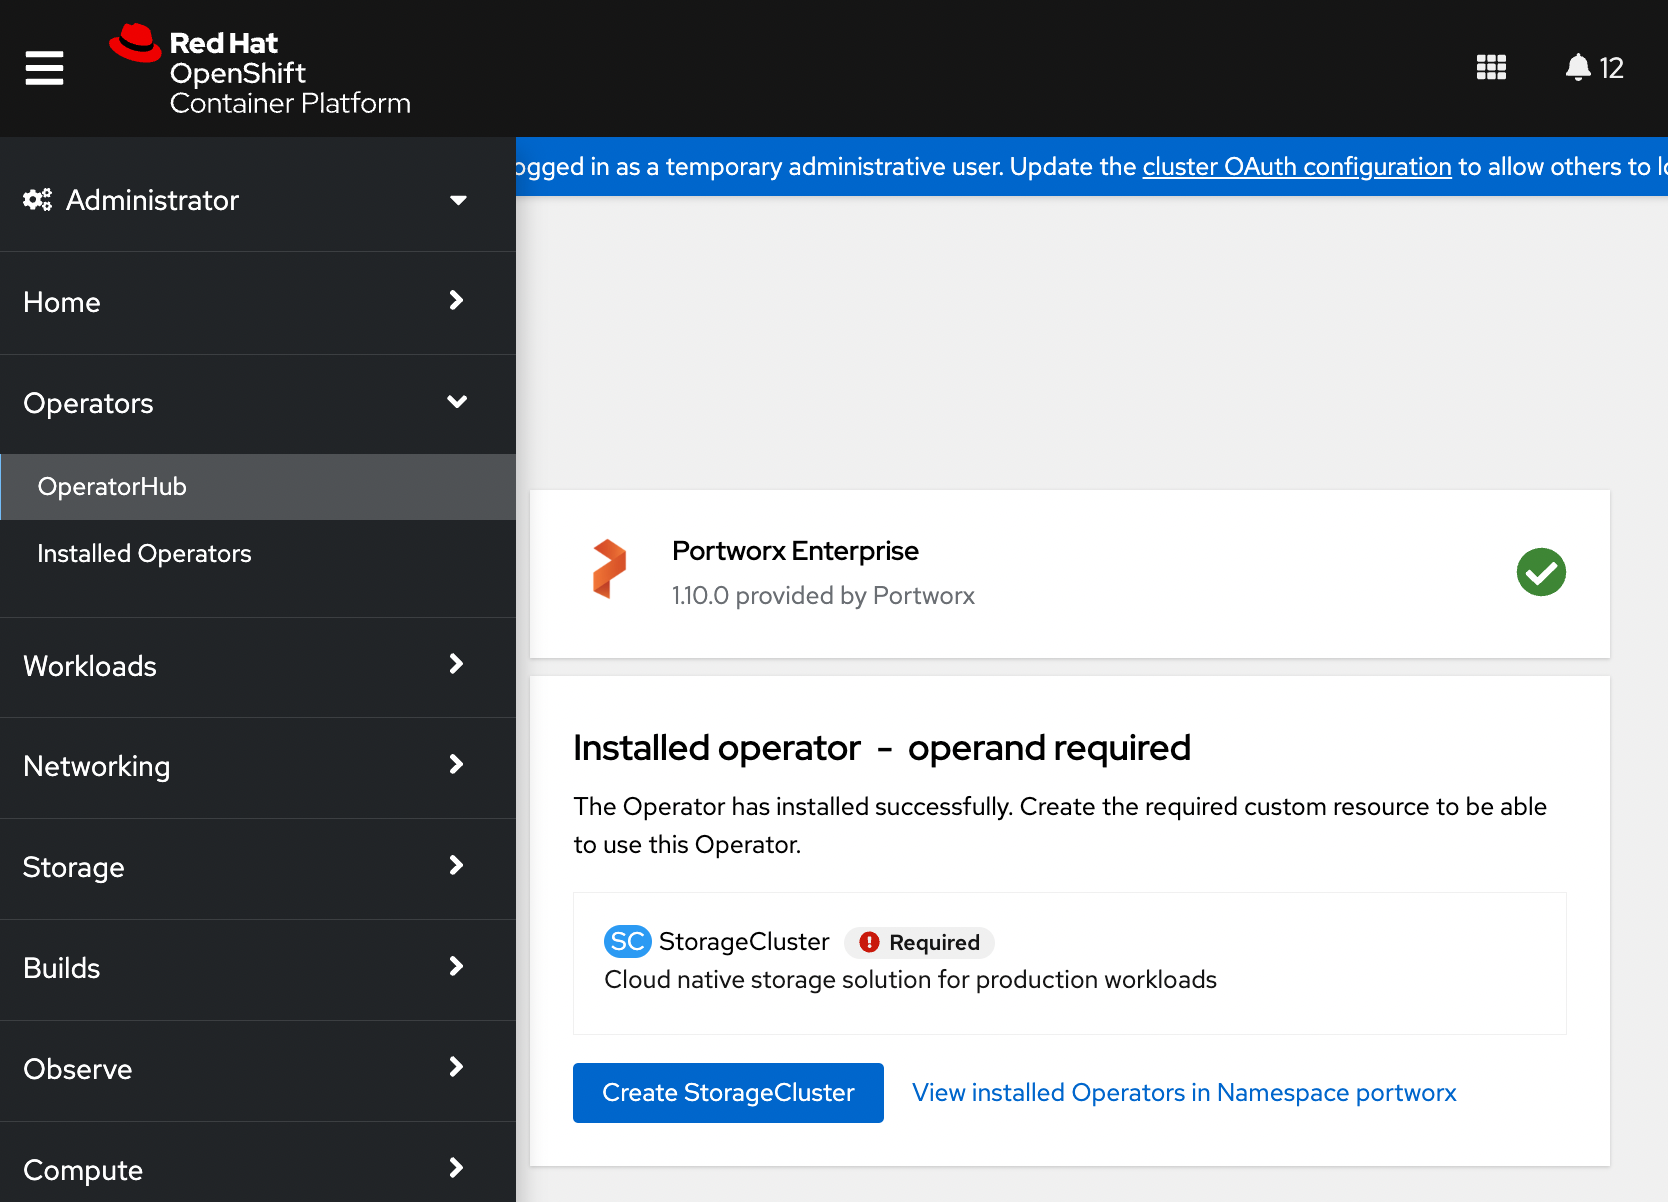
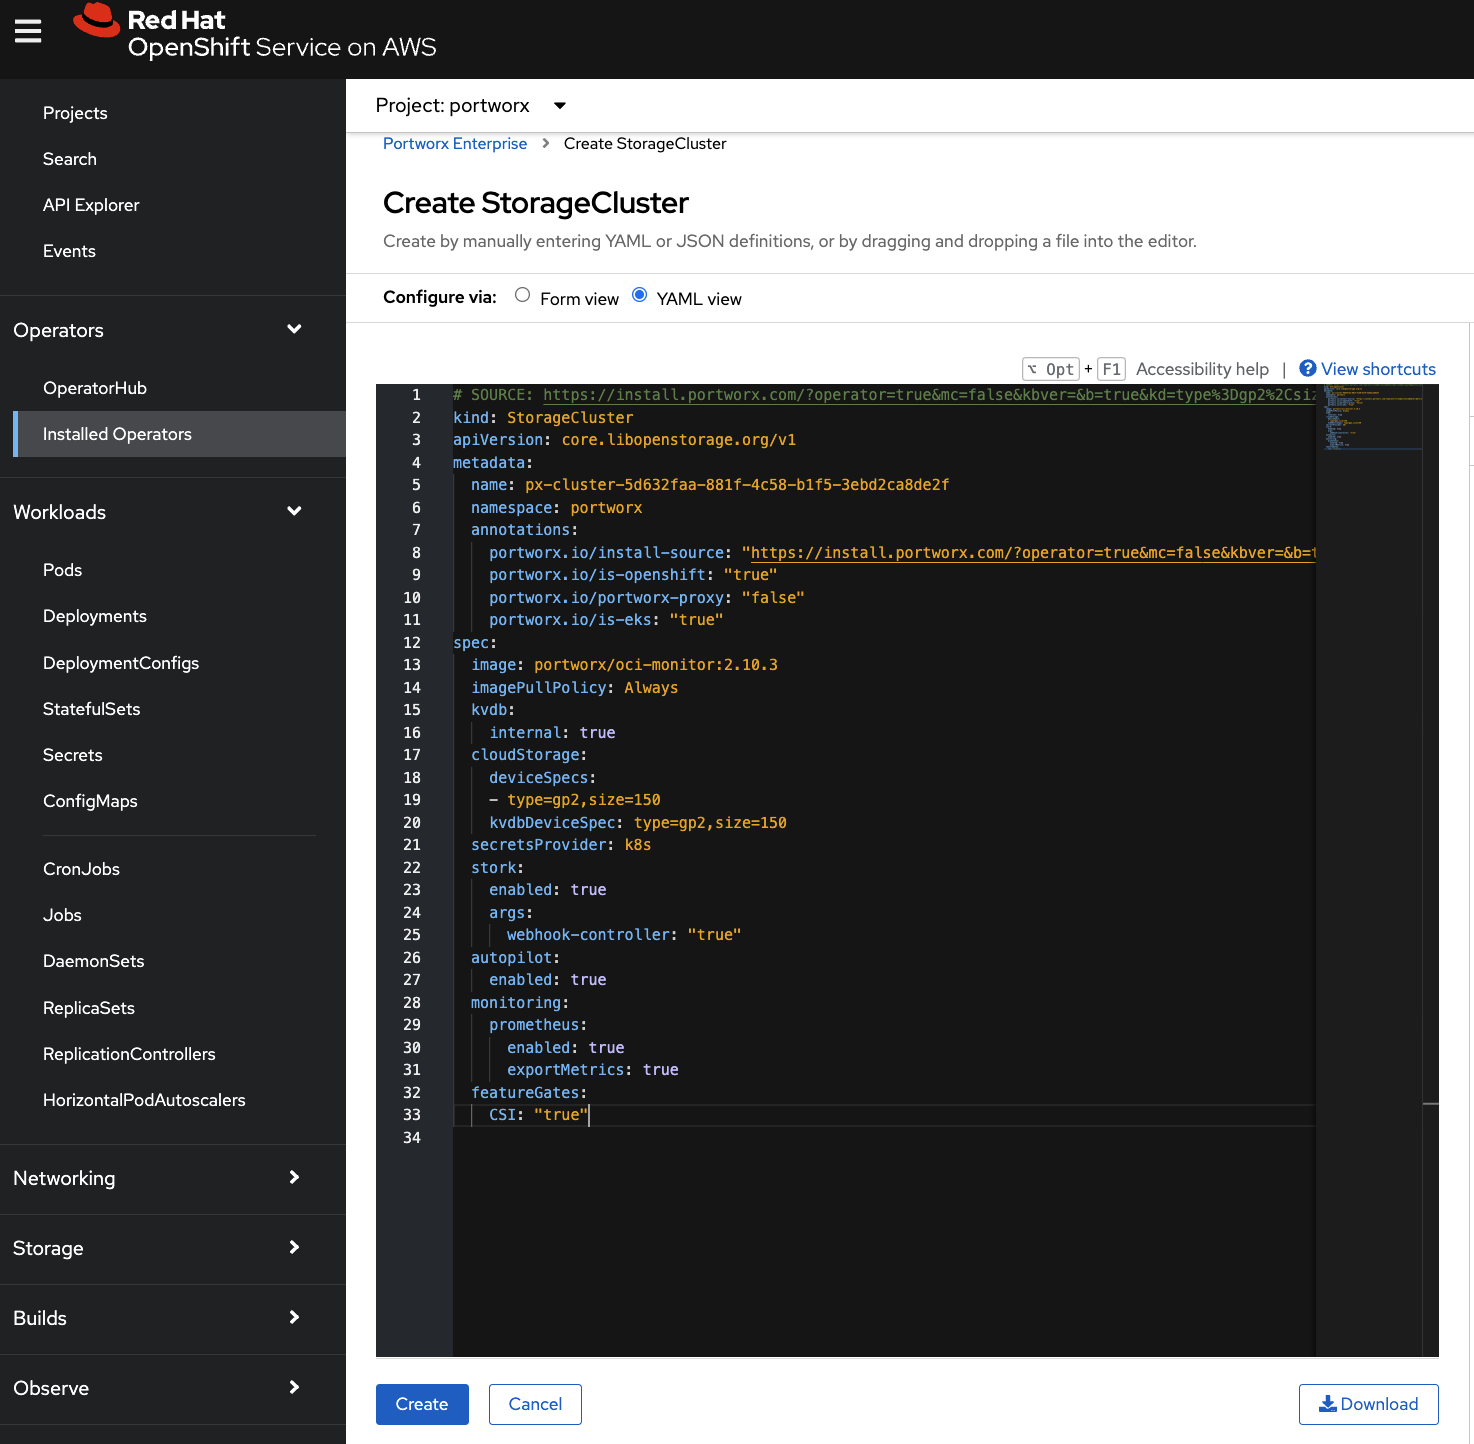
Once the Operator is installed successfully, create a StorageCluster object from the same page by clicking Create StorageCluster:
On the Create StorageCluster page, choose YAML view to configure a StorageCluster.
Copy and paste the above Portworx spec into the text-editor, and click Create to deploy Portworx:
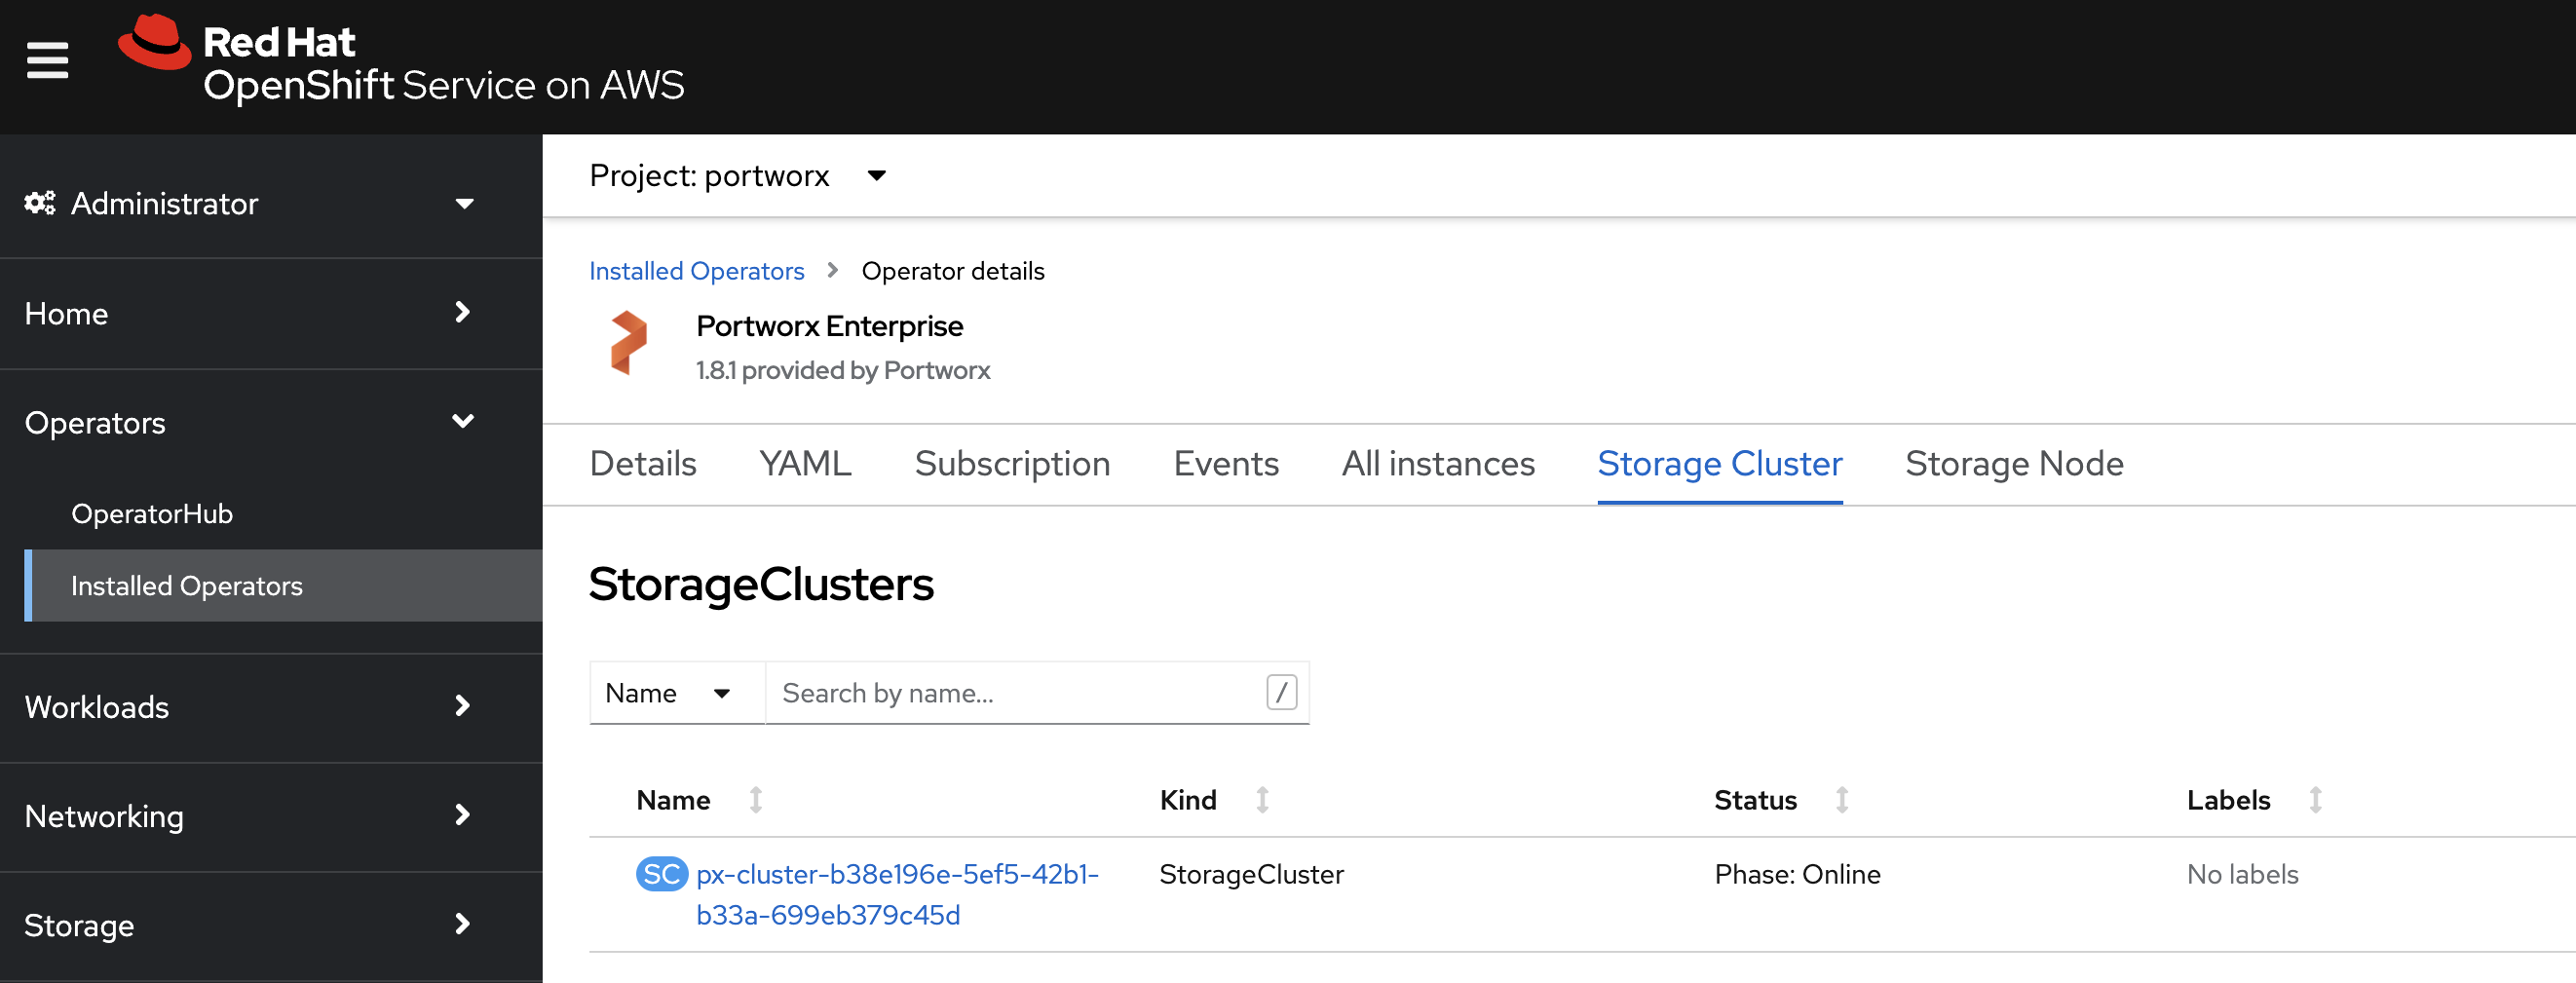
Verify that Portworx has deployed successfully by navigating to the Storage Cluster tab of the Installed Operators page. Once Portworx has been fully deployed, the status will show as Online:
Verify your Portworx installation
Once you've installed Portworx, you can perform the following tasks to verify that Portworx has installed correctly.
Verify if all pods are running
Enter the following oc get pods command to list and filter the results for Portworx pods:
oc get pods -n portworx -o wide | grep -e portworx -e px
portworx-api-774c2                                      1/1     Running   0                2m55s   192.168.121.196   username-k8s1-node0    <none>           <none>
portworx-api-t4lf9                                      1/1     Running   0                2m55s   192.168.121.99    username-k8s1-node1    <none>           <none>
portworx-kvdb-94bpk                                     1/1     Running   0                4s      192.168.121.196   username-k8s1-node0    <none>           <none>
portworx-operator-58967ddd6d-kmz6c                      1/1     Running   0                4m1s    10.244.1.99       username-k8s1-node0    <none>           <none>
prometheus-px-prometheus-0                              2/2     Running   0                2m41s   10.244.1.105      username-k8s1-node0    <none>           <none>
px-cluster-1c3edc42-4541-48fc-b173-3e9bf3cd834d-9gs79   2/2     Running   0                2m55s   192.168.121.196   username-k8s1-node0    <none>           <none>
px-cluster-1c3edc42-4541-48fc-b173-3e9bf3cd834d-vpptx   1/2     Running   0                2m55s   192.168.121.99    username-k8s1-node1    <none>           <none>
px-csi-ext-868fcb9fc6-54bmc                             4/4     Running   0                3m5s    10.244.1.103      username-k8s1-node0    <none>           <none>
px-csi-ext-868fcb9fc6-8tk79                             4/4     Running   0                3m5s    10.244.1.102      username-k8s1-node0    <none>           <none>
px-csi-ext-868fcb9fc6-vbqzk                             4/4     Running   0                3m5s    10.244.3.107      username-k8s1-node1    <none>           <none>
px-prometheus-operator-59b98b5897-9nwfv                 1/1     Running   0                3m3s    10.244.1.104      username-k8s1-node0    <none>           <none>
Note the name of one of your px-cluster pods. You'll run pxctl commands from these pods in following steps.
Verify Portworx cluster status
You can find the status of the Portworx cluster by running pxctl status commands from a pod. Enter the following oc exec command, specifying the pod name you retrieved in the previous section:
oc exec px-cluster-1c3edc42-4541-48fc-b173-3e9bf3cd834d-vpptx -n portworx -- /opt/pwx/bin/pxctl status
Defaulted container "portworx" out of: portworx, csi-node-driver-registrar
Status: PX is operational
Telemetry: Disabled or Unhealthy
Metering: Disabled or Unhealthy
License: Trial (expires in 31 days)
Node ID: 788bf810-57c4-4df1-9a5a-70c31d0f478e
        IP: 192.168.121.99
        Local Storage Pool: 1 pool
        POOL    IO_PRIORITY     RAID_LEVEL      USABLE  USED    STATUS  ZONE    REGION
        0       HIGH            raid0           3.0 TiB 10 GiB  Online  default default
        Local Storage Devices: 3 devices
        Device  Path            Media Type              Size            Last-Scan
        0:1     /dev/vdb        STORAGE_MEDIUM_MAGNETIC 1.0 TiB         14 Jul 22 22:03 UTC
        0:2     /dev/vdc        STORAGE_MEDIUM_MAGNETIC 1.0 TiB         14 Jul 22 22:03 UTC
        0:3     /dev/vdd        STORAGE_MEDIUM_MAGNETIC 1.0 TiB         14 Jul 22 22:03 UTC
        * Internal kvdb on this node is sharing this storage device /dev/vdc  to store its data.
        total           -       3.0 TiB
        Cache Devices:
         * No cache devices
Cluster Summary
        Cluster ID: px-cluster-1c3edc42-4541-48fc-b173-3e9bf3cd834d
        Cluster UUID: 33a82fe9-d93b-435b-943e-6f3fd5522eae
        Scheduler: kubernetes
        Nodes: 2 node(s) with storage (2 online)
        IP              ID                                      SchedulerNodeName       Auth            StorageNode     Used    Capacity        Status  StorageStatus       Version         Kernel                  OS
        192.168.121.196 f6d87392-81f4-459a-b3d4-fad8c65b8edc    username-k8s1-node0      Disabled        Yes             10 GiB  3.0 TiB         Online  Up 2.11.0-81faacc   3.10.0-1127.el7.x86_64  CentOS Linux 7 (Core)
        192.168.121.99  788bf810-57c4-4df1-9a5a-70c31d0f478e    username-k8s1-node1      Disabled        Yes             10 GiB  3.0 TiB         Online  Up (This node)      2.11.0-81faacc  3.10.0-1127.el7.x86_64  CentOS Linux 7 (Core)
Global Storage Pool
        Total Used      :  20 GiB
        Total Capacity  :  6.0 TiB
The Portworx status will display PX is operational if your cluster is running as intended.
Verify pxctl cluster provision status
Find the storage cluster, the status should show as
Online:oc -n portworx get storageclusterNAME CLUSTER UUID STATUS VERSION AGE
px-cluster-1c3edc42-4541-48fc-b173-3e9bf3cd834d 33a82fe9-d93b-435b-943e-6f3fd5522eae Online 2.11.0 10mFind the storage nodes, the statuses should show as
Online:oc -n portworx get storagenodesNAME ID STATUS VERSION AGE
username-k8s1-node0 f6d87392-81f4-459a-b3d4-fad8c65b8edc Online 2.11.0-81faacc 11m
username-k8s1-node1 788bf810-57c4-4df1-9a5a-70c31d0f478e Online 2.11.0-81faacc 11mVerify the Portworx cluster provision status . Enter the following
oc execcommand, specifying the pod name you retrieved in the previous section:oc exec px-cluster-1c3edc42-4541-48fc-b173-3e9bf3cd834d-vpptx -n portworx -- /opt/pwx/bin/pxctl cluster provision-statusDefaulted container "portworx" out of: portworx, csi-node-driver-registrar
NODE NODE STATUS POOL POOL STATUS IO_PRIORITY SIZE AVAILABLE USED PROVISIONED ZONE REGION RACK
788bf810-57c4-4df1-9a5a-70c31d0f478e Up 0 ( 96e7ff01-fcff-4715-b61b-4d74ecc7e159 ) Online HIGH 3.0 TiB 3.0 TiB 10 GiB 0 B default default default
f6d87392-81f4-459a-b3d4-fad8c65b8edc Up 0 ( e06386e7-b769-4ce0-b674-97e4359e57c0 ) Online HIGH 3.0 TiB 3.0 TiB 10 GiB 0 B default default default
Create your first PVC
For your apps to use persistent volumes powered by Portworx, you must use a StorageClass that references Portworx as the provisioner. Portworx includes a number of default StorageClasses, which you can reference with PersistentVolumeClaims (PVCs) you create. For a more general overview of how storage works within Kubernetes, refer to the Persistent Volumes section of the Kubernetes documentation.
Perform the following steps to create a PVC:
Create a PVC referencing the
px-csi-dbdefault StorageClass and save the file:kind: PersistentVolumeClaim
apiVersion: v1
metadata:
name: px-check-pvc
spec:
storageClassName: px-csi-db
accessModes:
- ReadWriteOnce
resources:
requests:
storage: 2GiRun the
oc applycommand to create a PVC:oc apply -f <your-pvc-name>.yamlpersistentvolumeclaim/example-pvc created
Verify your StorageClass and PVC
Enter the following
oc get storageclasscommand, specify the name of the StorageClass you created in the steps above:oc get storageclass <your-storageclass-name>NAME PROVISIONER RECLAIMPOLICY VOLUMEBINDINGMODE ALLOWVOLUMEEXPANSION AGE
example-storageclass pxd.portworx.com Delete Immediate false 24mocwill return details about your storageClass if it was created correctly. Verify the configuration details appear as you intended.Enter the
oc get pvccommand, if this is the only StorageClass and PVC you've created, you should see only one entry in the output:oc get pvc <your-pvc-name>NAME STATUS VOLUME CAPACITY ACCESS MODES STORAGECLASS AGE
example-pvc Bound pvc-dce346e8-ff02-4dfb-935c-2377767c8ce0 2Gi RWO example-storageclass 3m7socwill return details about your PVC if it was created correctly. Verify the configuration details appear as you intended.